Raisin Squares
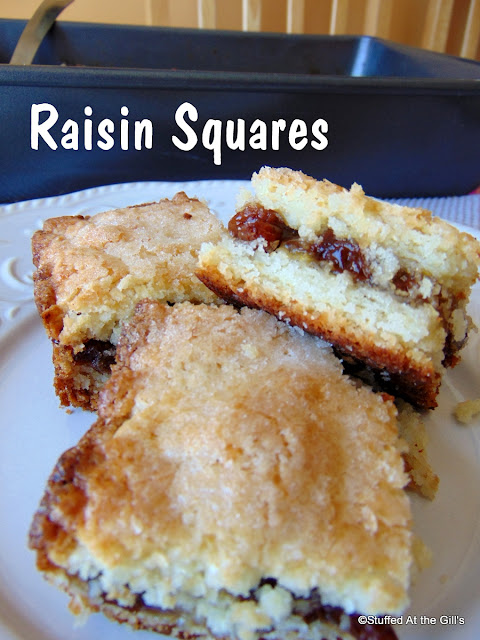
Raisin Squares sandwich a sweet raisin filling, with a hint of lemon, between tender, flaky pastry; almost a cross between a pie and a cake. Cut them small for a cookie square or cut them large for a delightful dessert square.
Raisin Squares bring me right back to my childhood. Growing up in St. John's, Newfoundland, there was a wonderful bakery, Chalker's, right across the street from the school I attended that sold the most delicious raisin squares. Whenever I was lucky enough to have an extra nickle or dime I'd make an after-school detour to the bakery and buy a raisin square. I think they cost a dime. They also made apricot, cherry and apple squares and one peculiar square called a "Sinker" that sold for a nickle. (If anyone reading this knows what a "Sinker" is you must have grown up in St. John's and are about my age or older.) |
| The inside of the Sydney River, Nova Scotia United Church Women's Cookbook. |
As a point of interest the bakery/take-out is still there but the ownership and name has changed. You'll find Fabulous Foods (aka Chalker's) at 166 Merrymeeting Road still doing a roaring business.
Some years ago I ran across a recipe for Raisin Squares in the old and tattered United Church Women's Cookbook from Sydney River, Nova Scotia. It's an ancient old book that my mother owned. Her brother, Walter, my uncle, had purchased several of the books in the late 1950s or early 1960s, when he passed through Nova Scotia, and gifted them to his sisters in Newfoundland. I know Mom used the cookbook as she had marked several of the recipes. But then I got my hands on it, stole it (with her permission) and started making many of the recipes myself. The Raisin Square recipe is one of the best in the book. It reminded me so much of the Chalker's raisin squares. The recipe needed a little tweaking as it didn't have much in the way of instructions for making the squares but I figured it out and these have been a favourite ever since.
Printable recipe at end of post.
Raisin SquaresRaisin Filling
- 1 250 gram package raisins/1¾ cups + 1 tablespoon
- 1 cup water
- ½ cup white sugar
- Pinch salt
- 2½ tablespoons cornstarch
- ¼ cup water
- 1 teaspoon grated lemon zest
- Juice of 1 lemon, about 2 tablespoons
Make Raisin Filling and let cool while making the crust.
In a saucepan bring raisins, 1 cup water, salt and sugar to a boil. Turn heat down and simmer 5 minutes. Mix cornstarch with ¼ cup water and add to simmering raisins. Bring back to a boil and cook 1 or 2 minutes until thick. Stir in lemon zest and lemon juice. Remove from heat and let cool.
Crust
Preheat oven to 375 degrees. Lightly grease a 9x13-inch pan or lightly grease and line with parchment paper.
In a large bowl, mix dry ingredients together. Cut in cold butter until crumbly. (If the butter is frozen, grate in with the large holes on a box grater.) Beat eggs and water together and toss and mix with the crumb mixture until a dough is formed. If dough is very soft, chill about 1 hour or until easy to handle.
Divide the dough into two equal pieces. On floured surface roll half the dough in a 9x13-inch rectangle to fit the pan. The dough is quite soft and may tear. Press together and patch any tears so there are no holes in the bottom of the crust. Evenly spread the bottom crust with the cooled Raisin Filling. Spread the filling to almost the edge. (See pictures below.) Roll remaining dough in another 9x13-inch rectangle to fit the top of the squares and place on top of the raisins. Trim and patch top if needed. You may want to roll the dough on waxed or parchment paper to make it easier to lift. If dough is too soft to lift, place in freezer for a few minutes to harden. This should make it much easier to handle.
Brush top dough with a little milk or cream. Sprinkle top of dough with 1 or 2 tablespoons white sugar. Bake in the preheated oven 30-40 minutes until golden brown. Cool completely and cut into desired size squares or bars.
I cut my squares 4 x 6 and made 24 squares. For a larger dessert square cut 3 x 5 and make 15 squares. You may serve these warm, instead of cold, with a scoop of vanilla ice cream for a delightful dessert.
Crust
- 2 cups flour
- 1 cup white sugar
- 2 teaspoons baking powder
- ½ teaspoon salt
- 1 cup cold butter
- 2 eggs
- 2 tablespoons cold water
- White sugar
- Milk or cream
Preheat oven to 375 degrees. Lightly grease a 9x13-inch pan or lightly grease and line with parchment paper.
In a large bowl, mix dry ingredients together. Cut in cold butter until crumbly. (If the butter is frozen, grate in with the large holes on a box grater.) Beat eggs and water together and toss and mix with the crumb mixture until a dough is formed. If dough is very soft, chill about 1 hour or until easy to handle.
Divide the dough into two equal pieces. On floured surface roll half the dough in a 9x13-inch rectangle to fit the pan. The dough is quite soft and may tear. Press together and patch any tears so there are no holes in the bottom of the crust. Evenly spread the bottom crust with the cooled Raisin Filling. Spread the filling to almost the edge. (See pictures below.) Roll remaining dough in another 9x13-inch rectangle to fit the top of the squares and place on top of the raisins. Trim and patch top if needed. You may want to roll the dough on waxed or parchment paper to make it easier to lift. If dough is too soft to lift, place in freezer for a few minutes to harden. This should make it much easier to handle.
Brush top dough with a little milk or cream. Sprinkle top of dough with 1 or 2 tablespoons white sugar. Bake in the preheated oven 30-40 minutes until golden brown. Cool completely and cut into desired size squares or bars.
I cut my squares 4 x 6 and made 24 squares. For a larger dessert square cut 3 x 5 and make 15 squares. You may serve these warm, instead of cold, with a scoop of vanilla ice cream for a delightful dessert.
Makes 24 cookie squares/15 dessert size squares.
To make the crust, stir the dry ingredients together to mix. Cut in or grate in the butter. The mixture should be crumbly. I often keep butter in the freezer so grating it is easier than cutting it in. Beat the eggs and water together and toss and mix the flour into a dough.
When the dough has formed, refrigerate it about an hour if it seems too soft to roll. Divide the dough in two equal pieces. Roll out the first half and fit in the prepared pan. You may have to fix a few tears by pressing the dough together. Spread the Raisin Filling evenly over the bottom crust. Spread to almost the edge.
Roll out the second piece of dough and place on top of the Raisin Filling. Patch any noticeable tears and trim the edges if the dough is riding up the side of the pan. Brush the top dough with a little milk or cream and sprinkle with a tablespoon or two of white sugar.
The squares remove quite easily from the pan. If you'd like to lift out the whole lot, line the pan with parchment paper and lift using the edges of the paper as handles.
Make the raisin filling first so it can cool down while making the crust. Combine the raisins, sugar, salt and 1 cup water together in a saucepan. Let the mixture come to a simmer for 5 minutes. Mix the cornstarch with the ¼ cup water and stir into the hot raisins until thickened. Cook an additional minute then stir in the grated lemon zest and lemon juice. Set aside to cool.
To make the crust, stir the dry ingredients together to mix. Cut in or grate in the butter. The mixture should be crumbly. I often keep butter in the freezer so grating it is easier than cutting it in. Beat the eggs and water together and toss and mix the flour into a dough.
When the dough has formed, refrigerate it about an hour if it seems too soft to roll. Divide the dough in two equal pieces. Roll out the first half and fit in the prepared pan. You may have to fix a few tears by pressing the dough together. Spread the Raisin Filling evenly over the bottom crust. Spread to almost the edge.
Roll out the second piece of dough and place on top of the Raisin Filling. Patch any noticeable tears and trim the edges if the dough is riding up the side of the pan. Brush the top dough with a little milk or cream and sprinkle with a tablespoon or two of white sugar.
Bake 30-40 minutes until golden brown. Let cool in pan.
Cut into squares--smaller squares to eat like cookies; larger squares for a dessert treat.


I just had a craving for a raison square and came across this one. My maiden name was Chalker. The bakery you speak of was owned by my Dad. I worked there as a young girl growing up. Thank you for the reference. Although I ate many sinkers in my day I'm not sure what they were made of. I'm gonna try your raison square recipe. Thanks.
ReplyDeleteThank you so much for your comment. I'm thrilled you took the time to reply. I loved going to Chalker's. I'm sure you'll enjoy these raisin square. Too bad you don't know what was in the Sinkers as I'd love to recreate them.
DeleteHow does a 4x6 square yield more than a 3x5???
ReplyDeleteIn Scotland, these are called Fly Cemeteries!
Sorry but worst dough I ever worked with
ReplyDelete